The preparation
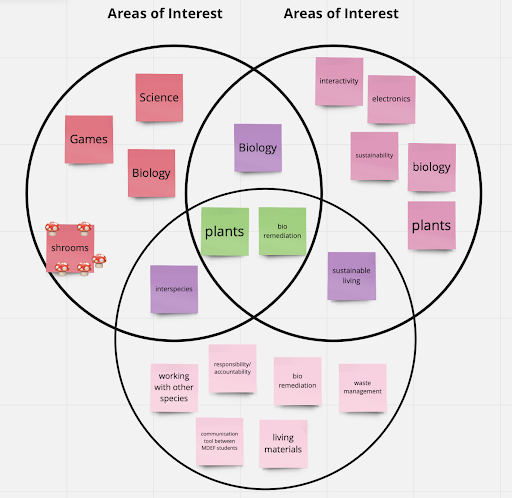
When we (Marina, Tatiana and Roberto) teamed up together to work on the fabacademy monthly challenge, we began by outlining our different interests, trying to find common ground for the project. We noticed plants, biology, science, interactivity and bioremediation pop up in common.
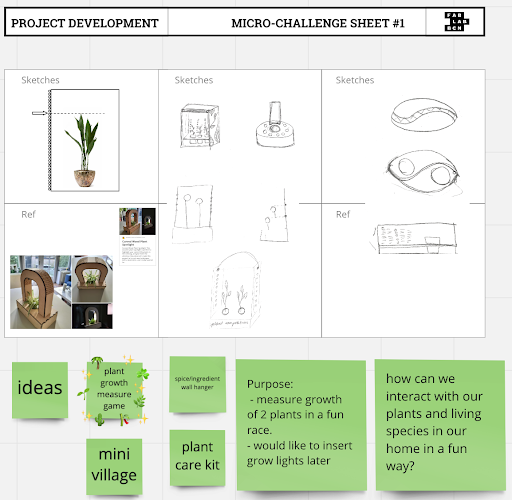
Some ideas popped up, like a spice holder, plant pots or even a small laser cut village.
We asked ourselves
How can we interact with our plants and living species in our home in a fun way?
 =======
 >>>>>>> 88b4a9e37516d2370d1e3c932a62712eb5a3ee71
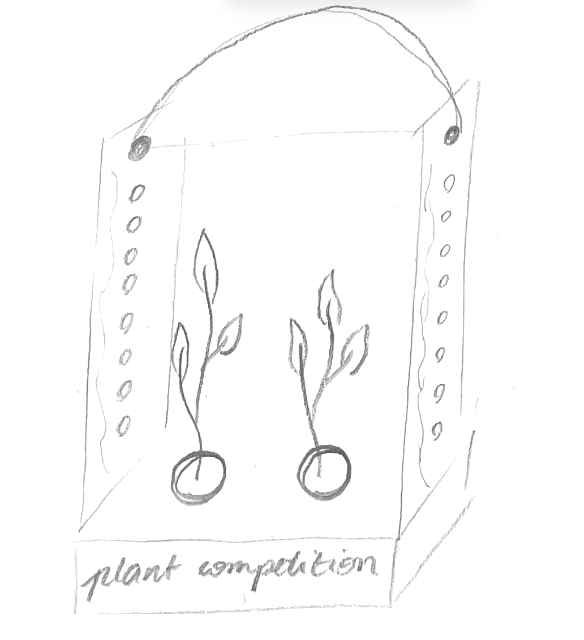
We decided upon a game involving plants: the plant race

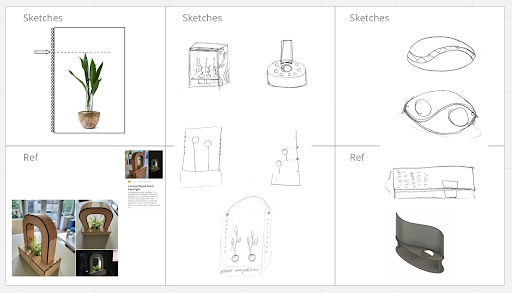
Once the concept was defined, each of us separated and decided to work on different areas: Tatiana did the sketches and documentation, Marina updated the Miro board and Roberto started 3D modeling.

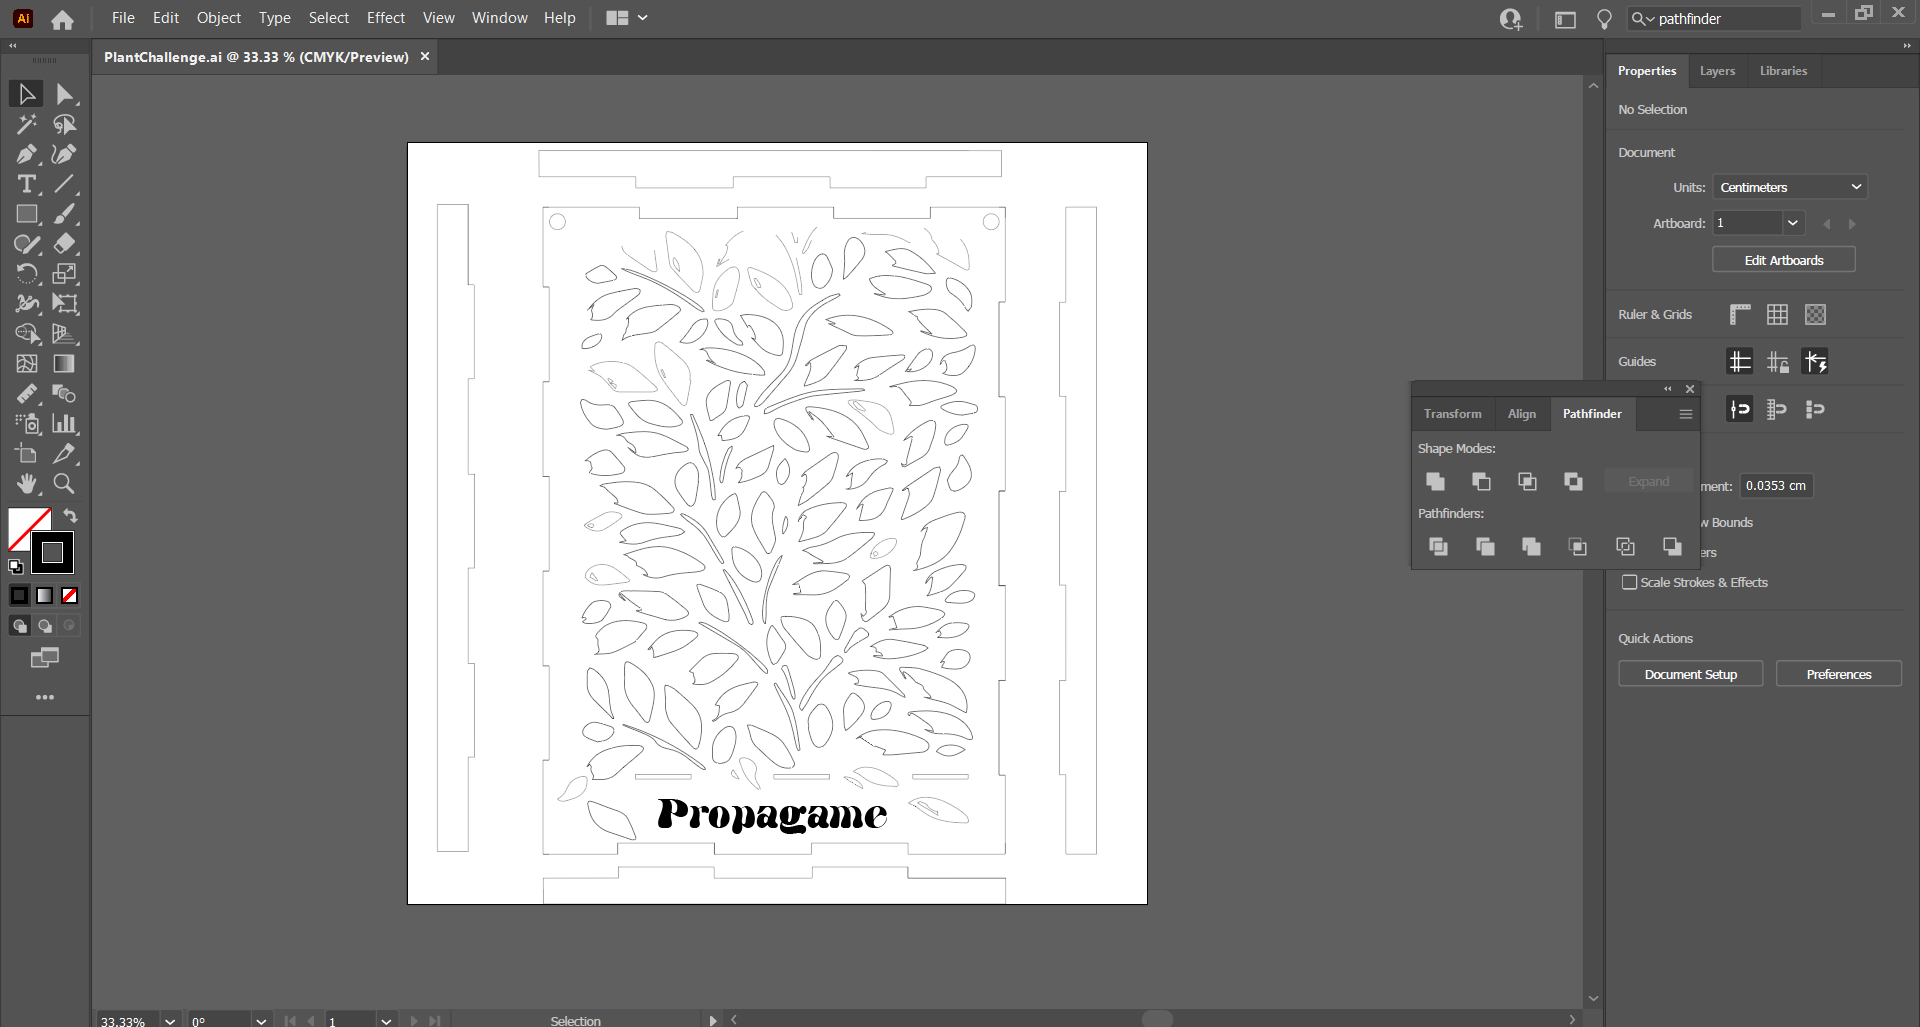
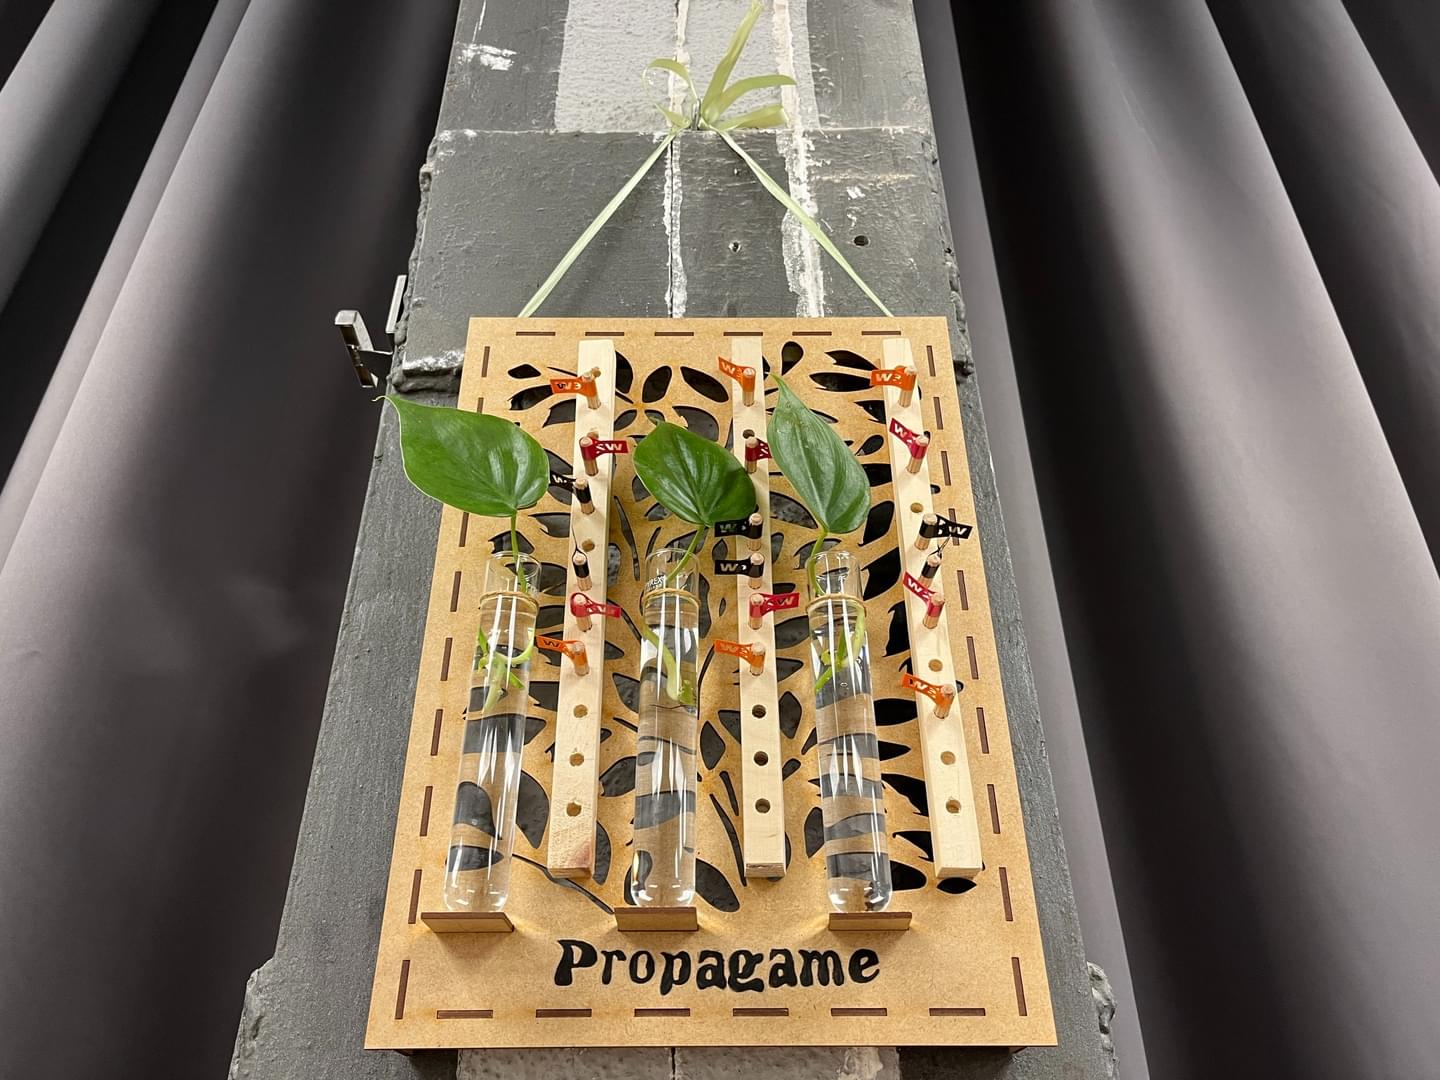
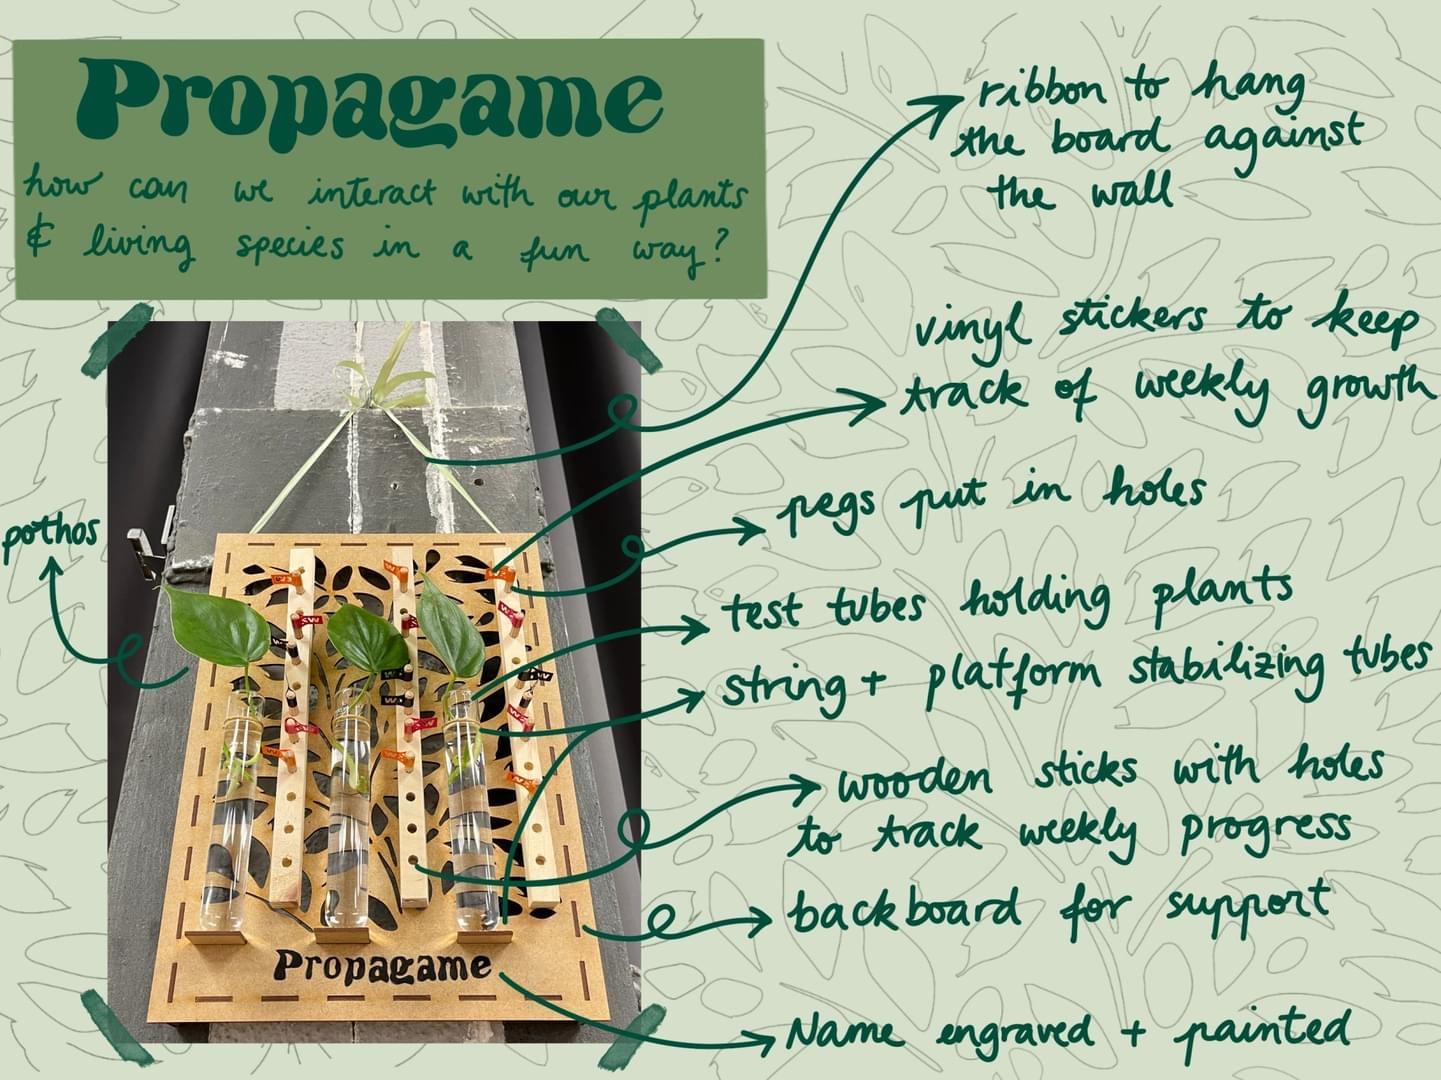
On Wednesday, we finalized the sketches in order to get a clear idea of the output. We decided we wanted to make a panel that could be hung up on a wall, displaying propagated plants in test tubes. By choosing the propagated plants, we got the idea for the project: “Propagame”.
We started gathering all the materials needed:
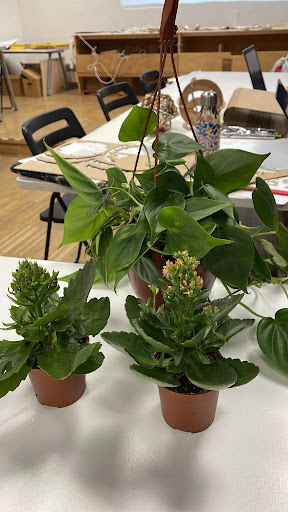
First thing in the morning on Thursday, we all went to a plant shop to buy the plants we needed. The store was closed, so we sat in the sun while waiting for it to open.
Once the store opened, we searched for something which could be propagated in water, so that it could fit well in the test tubes we got the previous day. We decided upon getting a Pothos which we could cut and propagate, then two smaller plants in case we wanted to make a standing version of the plant game, in addition to the wall hanging one.
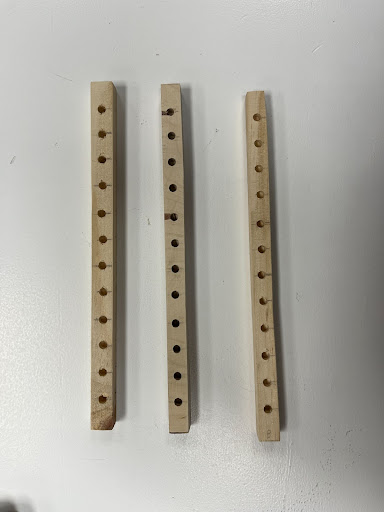
After this, Marina and Tatiana worked on making the wooden sticks in which to put the pegs. We found some scrap wood which we could use and began measuring the desired length, according to the tube length. One thing to note is that the scrap wood we found each had slightly different compositions and sizes, which is important to consider in the next few steps.
We settled upon making each piece 26cm, made the marks for the cuts and began cutting. We used the saw, then sanded the edges in order to get them all the exact same width and depth. It was hard to achieve this, but we managed.
Once every wooden piece was the same size and circumference, we proceeded to mark where we wanted our holes for the pegs to be. The pegs we chose were actually 0.6mm x 30mm dowels, so we based our measurements upon this. We chose to space the holes in 2cm gaps, but looking back we could have definitely gone smaller, perhaps 1,5cm.
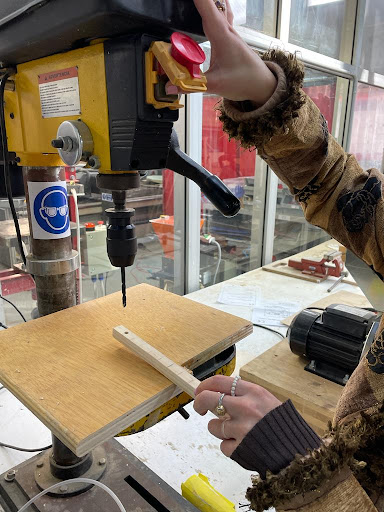

We chose a 0.6mm drill attachment and began drilling according to the marks. After a few holes, we found a technique which worked well for us: Tatiana positioned the stick lengthwise while Marina centered it widthwise, making it align as perfectly as possible. We got our holes done and were super happy!
A consideration to keep in mind is that, given the difference in materials, some sticks were more fragile than others, especially the composite layered wood. This meant that some of the edges broke off during the drilling process, as pictured in the center piece.
While Marina and Tatiana worked on the wooden sticks, Roberto finalized the laser cutting project. We encountered some file compatibility issues, so we were set back a little bit.
Fabrication process of laser cutting:
- Laser cutter for cutting 3mm MDF: 55 power, 0.5 speed
- Laser cutter for engraving 3mm MDF: 70 power, 100 speed

First iteration (3D Fusion)
Second iteration (2D Illustrator)
Third iteration (Parametric sketch on Fusion)
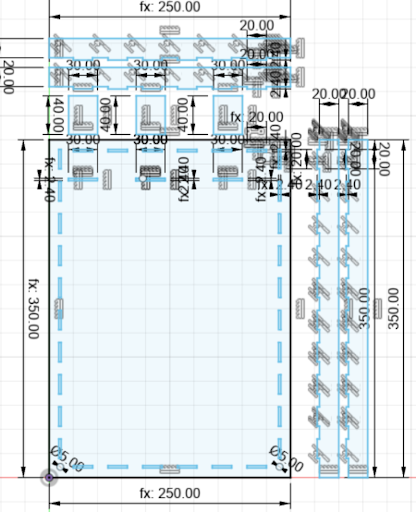
Once we finished cutting the board on the laser cutter, we proceeded to assemble the different parts. We encountered some problems the first two times we cut the board such as the finger joints not fitting properly, so we had to iterate twice. The final result was one that could fit very well.
Cutting and assembling the board
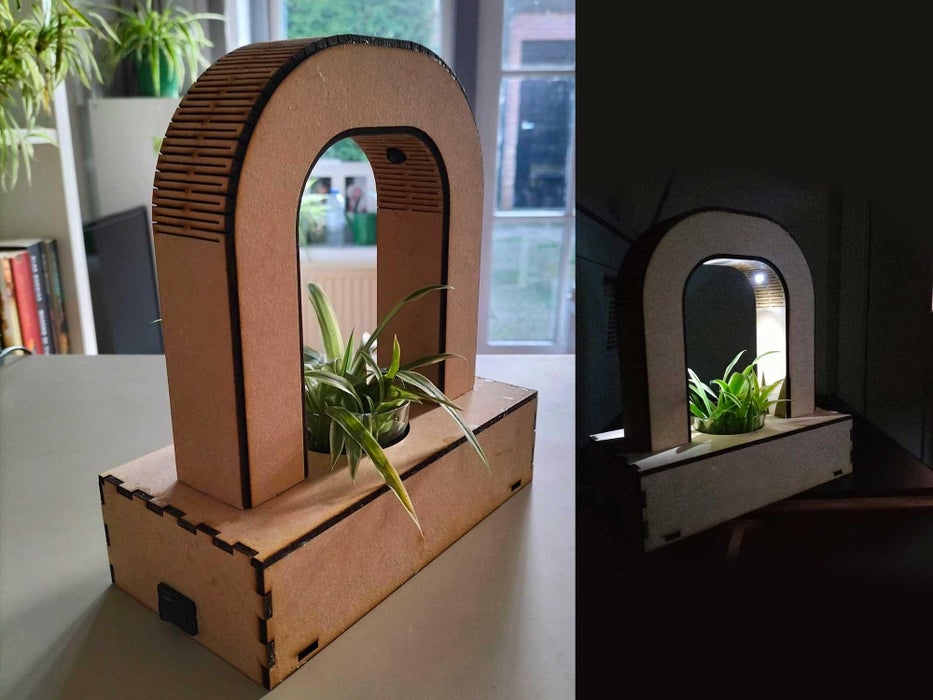
Final Product
Techniques Used
- Sawing the wood
- Sanding the wood (machine + manually)
- Drilling the wood
- Designing the board in 2D, 3D and parametrically for the various iterations (Fusion, Illustrator and Rhino)
- Laser cutting the board
- Gluing the wood onto the board
- Designing vinyl cut stickers (Illustrator)
- Vinyl cutting the stickers for the pegs
- Painting the board
- Using git and html to document the process.
Future Developments
Propagame has a lot of potential for growth due to its flexible nature. We have started small with plants that can easily propagate but it can develop further into also including:
- Lights that serve as both a spotlight to showcase the plant, as well as a growing medium for indoor plants.
- Sounds, which would attract higher visibility.
- A stand-level version of Propagame which would be able to handle bigger plants and record changes over longer periods of time. It could serve as an A/B testing methodology for plant growth, comparing different kinds of plant supplements, lightning, watering, and many more.
Considerations & Mistakes
- We could have made more holes for the pegs
- Selecting the same wood composition sticks would have yielded a more uniform look and also help the process of drilling and sawing.
- Not using finger joints but rather press-fit holes gave us tighter fit
- Lining up the panels dimension better in Rhino, in order to avoid sawing off the edges would have helped.
- When vinyl cutting, we had to make sure to use a big enough font for it to be readable.
- Using Illustrator was not the best software to design the board, we should have done it in Fusion and Rhino to avoid compatibility issues from the beginning.
Links to Personal Posts
Roberto
https://roberto-broce.github.io/MDEF-website/micro1.html
Tatiana
https://tatiana-butts.github.io/tatiana-butts/fabacademy/fabchallenge1.html
Marina
https://marina-lermant.github.io/mdef-website/fab3.html
Downloadables
- Board design.ai
- Board design with components 3D Model.f3d
- Final board design with finger joints.dxf
- Flags vinyl design.dxf
UPDATE! Completing our website based on the feedback we received.
Integrated design
How the pieces relate to each other and fit in with each other:
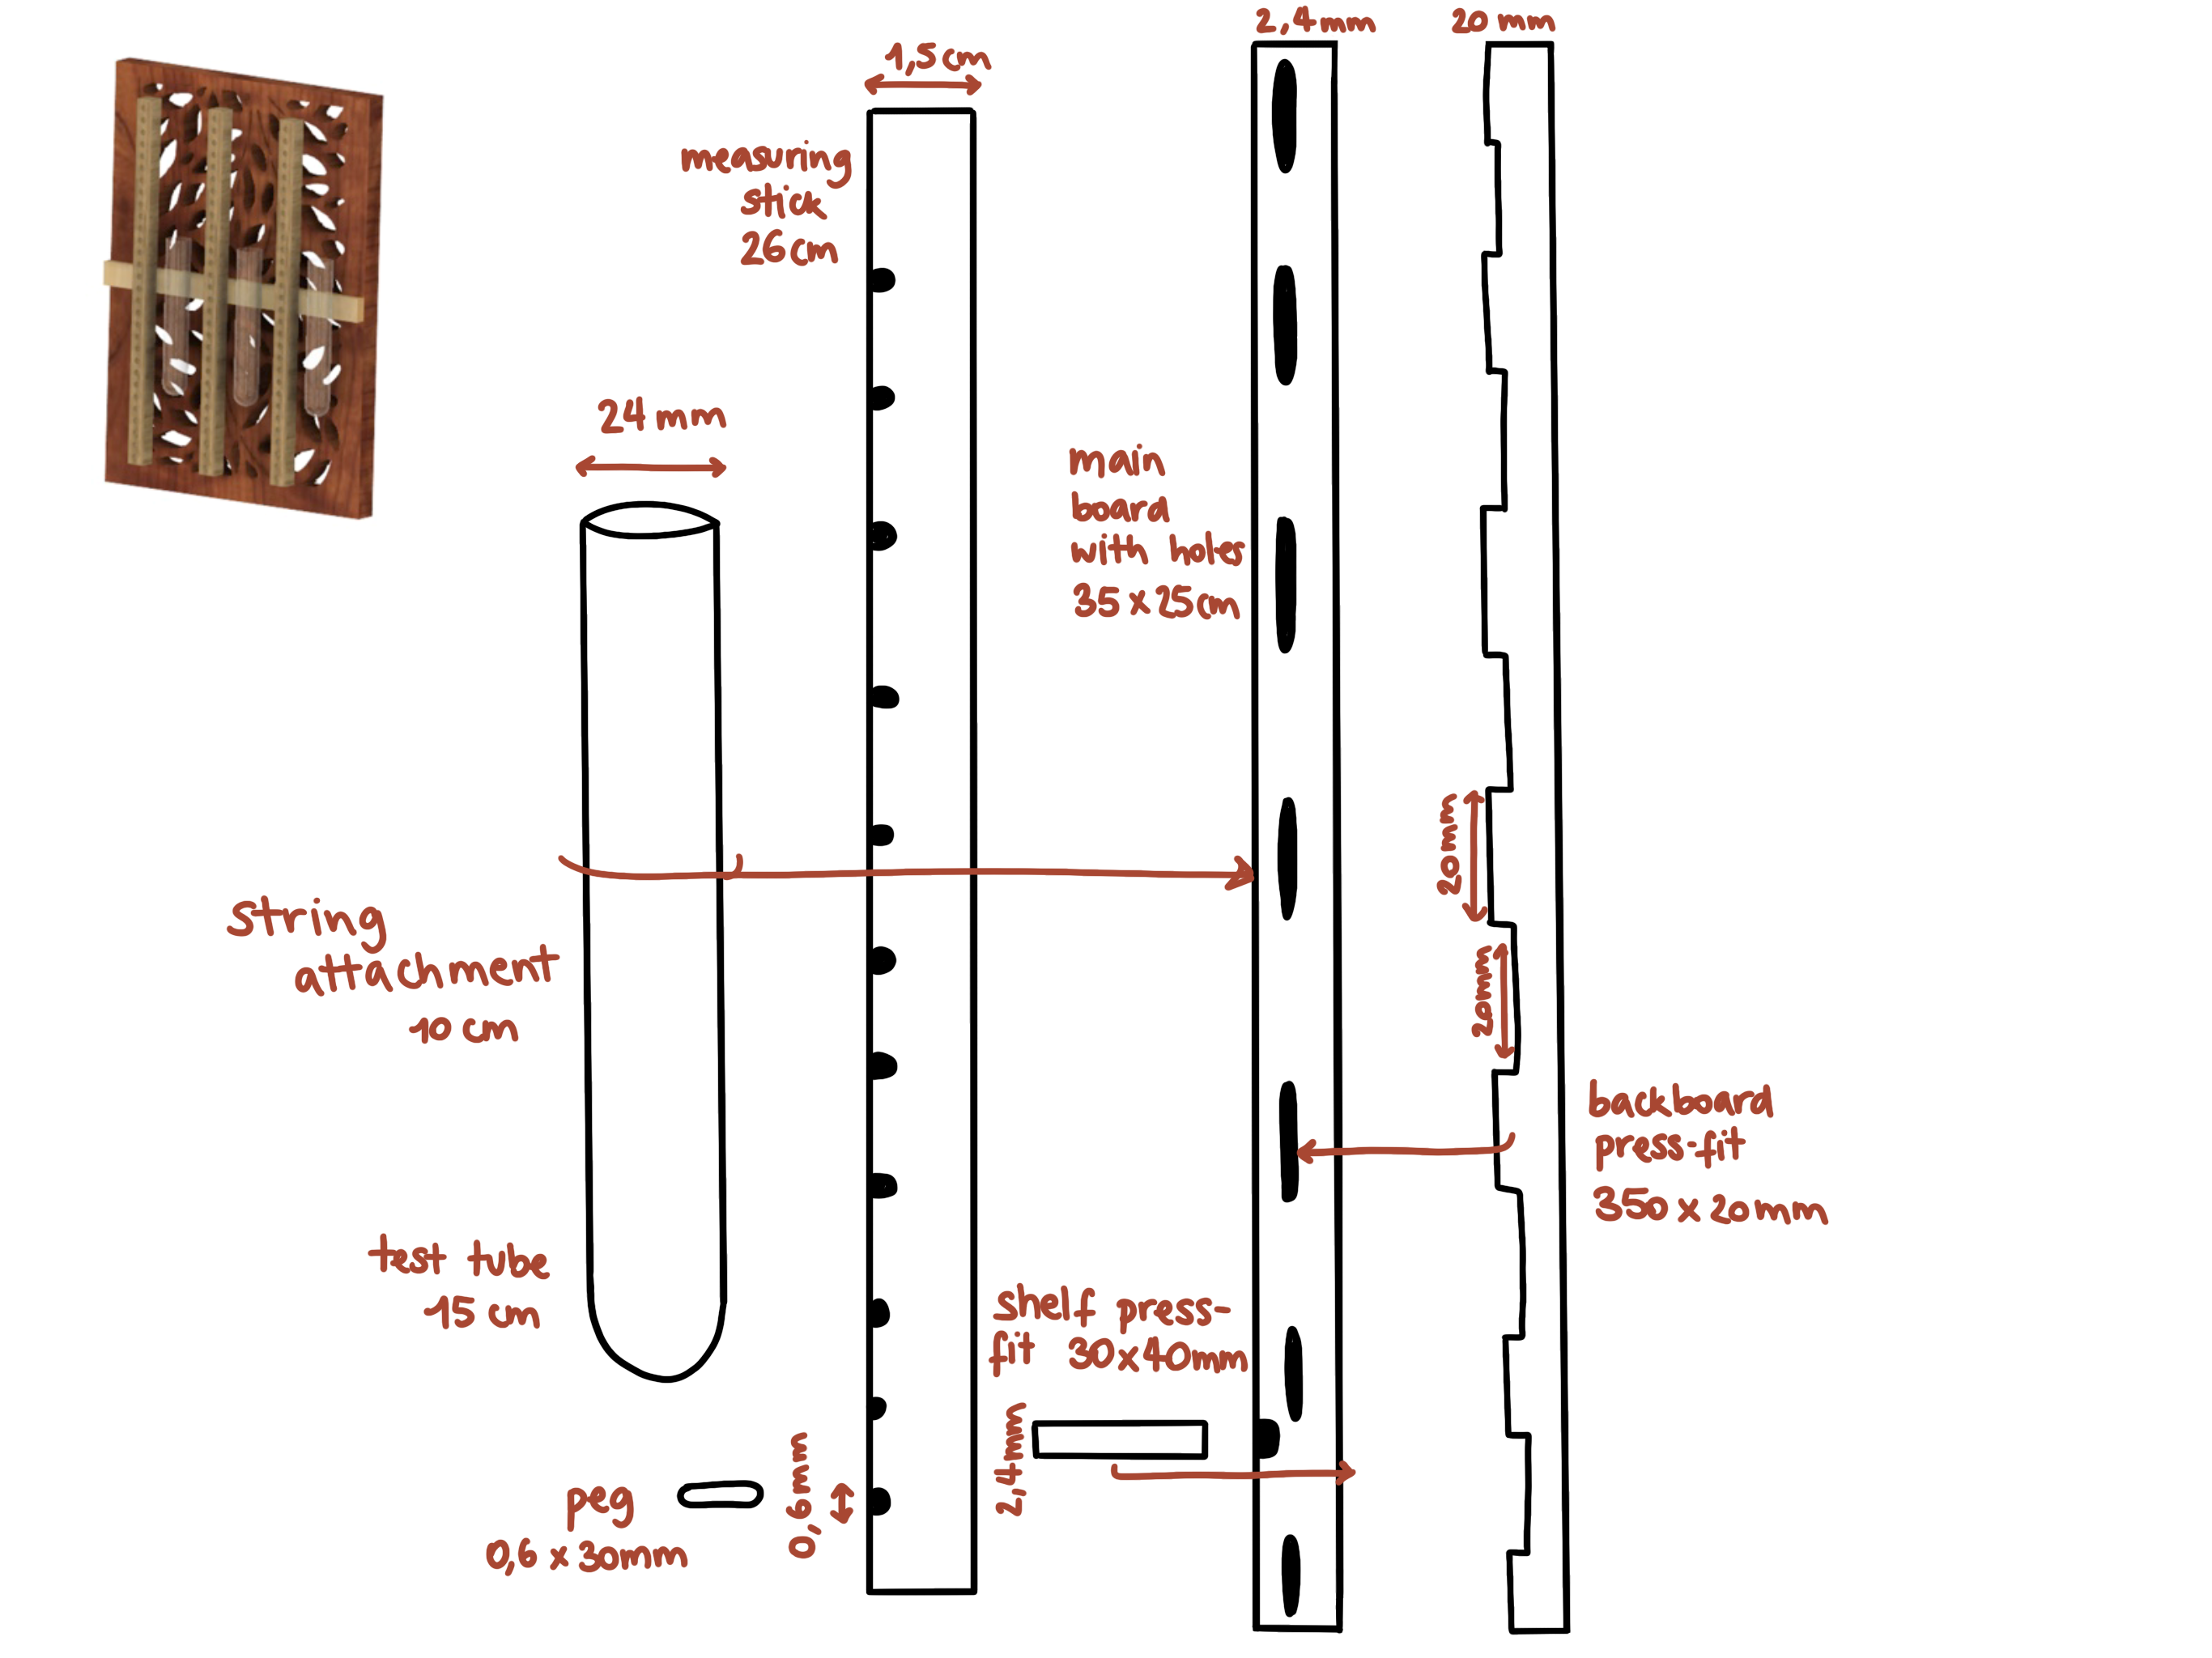
-The board is mounted together using a press fit structure: the back panel has rectangular edges that click perfectly into the main panel.
-The wooden pieces are then glued onto the main board with wood glue, and each piece has holes in which you can insert the individual pegs.
-Next to the wooden measuring pieces are transparent glass tubes secured on the main board with a string going through the holes and resting atop the shelves poking out of the main board.
Be creative
We tried to insert creativity in our project by viewing the roots, thus measuring the plant upwards and downwards too. It would have been easier for us to simply using plant pots, but we resorted to using tubes instead for the aesthetic and practicality bonus.
In addition to this, we wanted to use as much scrap material as possible, which constrained us to be creative with what we could find: the measuring sticks were scrap wood and the string and ribbon were both reused from previous projects.
Explore design boundaries
None of us have had much experience with digital fabrication, so this project was a way for us to push ourselves out of our comfort zone and gain some new skills. By constraining ourselves to use all the new skills we’ve been exposed to so far (2D + 3D modeling, laser cutting, woodwork, drilling, sanding, vinyl cutting) we pushed the boundaries of the tools and resources we would normally use while making a project.
Describe problems and how we solved them
We encountered a series of difficulties which we had to work around in order to overcome:
- We were not able to find one piece of scrap wood that would provide enough material to create all of the sticks. If we had used wood with the same composition it would have been more uniform and easier to cut and sand evenly. The composite wood piece chipped a bit when we were drilling, so we had to approach it much more slowly and softly to not crack the top layer, which we ended up sanding a bit to even out.
- By using illustrator instead of rhino, the file turned out less precise. Since the laser cutter uses rhino to open and cut files, it is easier to use it when drawing the design in 2D to ensure the file will be compatible with all lines closed. We chose to use Fusion for the following iterations because it was more precise when opened in Rhino.
- The first design utilized finger joints. The newer design using press-fit allowed the board to have a tighter fit, so we had to reconsider that the change in dimensions of the board would be a bit different. We took this into consideration when redesigning the second version in Fusion.
- With the new press-fit, we didn’t account for lining up the new smaller edges in Rhino. Because of this, we had to saw off the extra length.
- Using the vinyl cutter took a bit of testing. The original flags we wanted to make had a small font in order to spell out the entire work “week”. After cutting out the flags as we wanted, we saw that the font was much too small and would have been too difficult to detach. Therefore, we increased the font and chose to abbreviate week to “W”.
Iteration process
After drawing two sketches for types of games based on a hanging version, and a tabletop version, we ended up choosing the hanging one because we were able to track the growth of the roots by using clear glass test tubes, although the other version would be better for growing bigger plants. We started by creating a model in fusion, then mapping out the design in illustrator. However, since the file’s lines did not match up perfectly, the file was redrawn in fusion and we were then able to laser cut it with correct alignment. While both designing the file and putting together the laser cut pieces, we had to readjust how the joints would fit together based on the new design. We also had to rethink how the board would be hung, considering the strength of the board and where the best position would be to attach the ribbon.
Dealing with uncertainty
Along the process, we were continuously planning and speculating how the project would develop and come to its final form. Of course, things changed along the way and we had to adapt to any conditions that did not work how we thought they would. We saw how learning about the fabrication process informed our design and vice versa where we needed to think about the ways in which the tools we were planning to use would work.
Don’t be afraid to make mistakes
Starting the challenge, we had practiced using the machines, tools, and techniques we had learned without much experience or practice, but we all went into it with a mindset to be ready to learn and take on the challenges as they came. By the end, we were able to work together within our group, as individuals, and with the help of the FabLab team to fully develop our project and become more comfortable with using the fabrication tools.